

and learning why everyone just uses Github.
Have you ever thought about hosting your own “GitHub-like” service so that you can stay away from Microsofts prying eyes and own your code. Do you want your code to not be used by large multi-national organizations to train the next generation of Large Language Models?
Well, wonder no longer because in this article I present how to do a minimal deployment of a git server on Kubernetes. The deployment would work and look a little like this.
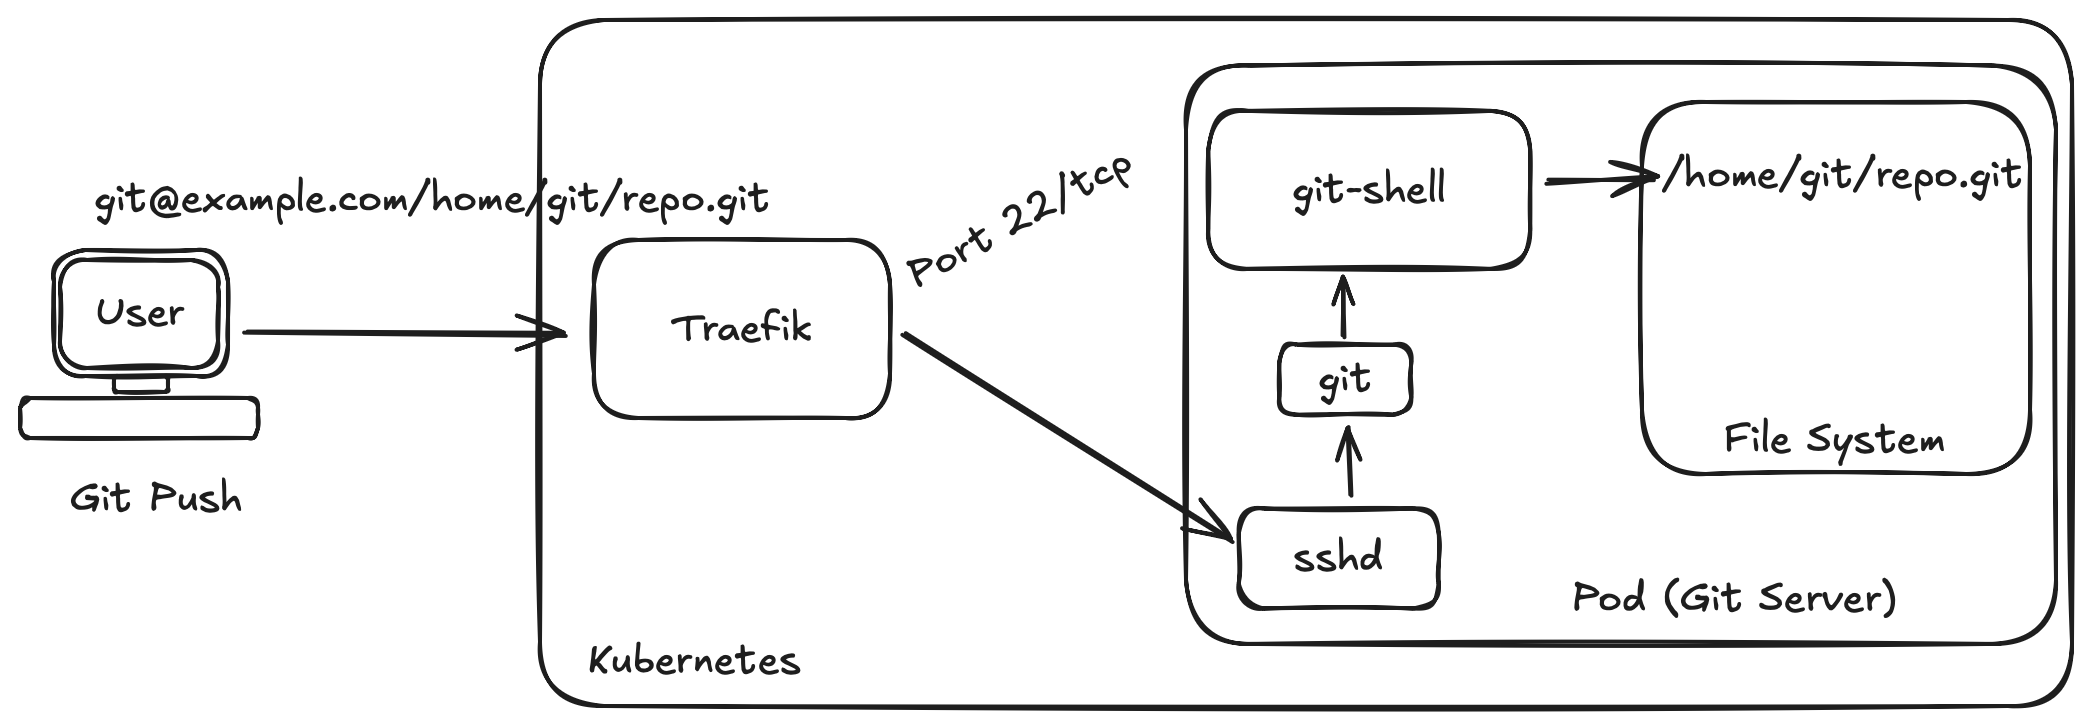
You'll also learn why you might want to think again before deploying your own git server and some alternatives you might want to use instead. But before we go over how to deploy it all, we should probably answer...
What even is a Git Server?
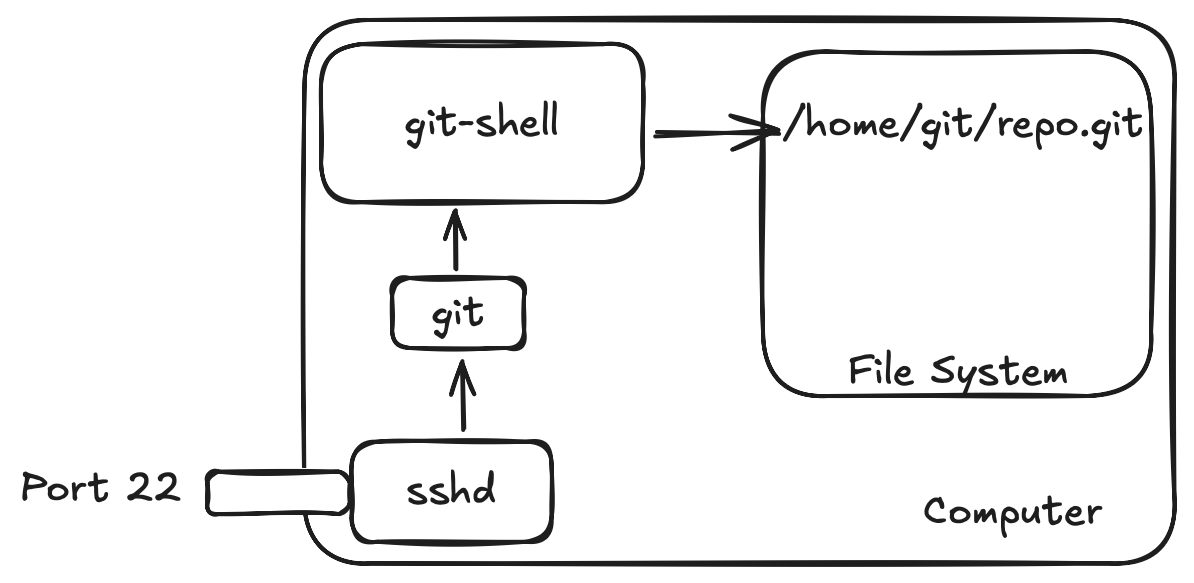
A shell program called git-shell believe it or not! But that's an oversimplified explication. In reality, a Git server is built upon different technologies like Secure Shell (SSH), unix users and then git-shell program.
Therefore, before we can understand how to deploy a git server, we need to understand how we can connect to a server over SSH and authenticate as a user.
SSH connections
All git commands are issued over an SSH connection. SSH is a way for you to run commands on a remote server as a particular user in a secure way over an TCP connection. Most people would use a daemon program (a program constantly running in the background) on their computer called sshd. It will manage connections into the server and starting a shell once a successful connection has been made.
We can use this as a way for users to access our remote system.
The best practice to support connections over SSH is to use Public Key Authentication. For it to work correctly, you'll need to collect all the public keys from your user base that will be trying to connect to your remote server. These public keys would be used to prove that a person is who they say they are. Place those keys in a file called ~/.ssh/authorized_keys.
With that file created, we can run the sshd daemon which will run a program that will accept socket connections on port 22 (default port). Only users with the correct private keys will be able to create an SSH connection to the server.
sshd_config file has AuthorizedKeysFile option set to ~/.ssh/authorized_keysGit has more documentation on how to do this.
We'll need to save the authorized_keys under a particular unix user.
Unix User
All SSH connections must be made with the context of a user you are trying to connect as. In most cases you'll want to configure the git server with a user name of git. Doing so will replicate a similar Github url.
Once the git user is created, place the authorized_keys file we just created in their home .ssh directory (probably /home/git/.ssh). The user also needs to be configured to have a shell to run upon SSH connections. In this case, we use git-shell so only git operations are supported.
chsh -s git-shell gitgit-shell
Normally, when a user connects to a remote server, the user would be configured to use a shell program like sh or bash. We don't want to support this as many random people might be connecting to our server. Using these shells would allow someone connecting to our server with a lot more access than they require.
Instead we use git-shell which only supports a very small handful of commands specific to the git program to run on the remote machine.

This makes it relatively safe to run a server with port 22 exposed. The git program on your local computer knows the CLI command that git-shell has. Once the git program on your local computer successfully logs into the remote computer as the git user, it's able to run these git-shell commands on the remote system.
With sshd running on the server, git user created and configured with git-shell, we can now create a repository to push to.
Initialize a repository on the server
Before you push your code to the remote server, you'll need to create the repository first. This isn't Github where you get a pretty UI to do your administrative functions! A bare repo must exist before you can push any code to the repo.
git init --bare /home/git/repo.gitWith the bare repo created, we can finally run the following commands successfully.
git remote origin git@example.com:/home/git/srv/repo.git
git push origin master -u
Understand the components of a Git URL
Let's take a look at a GitHub URL and understand the different parts so that we can understand how SSH interprets the information.
git@github.com:rockstorm101/git-server-docker.git
- We are connecting to
github.com - We use DNS to resolve
github.comto140.82.113.4 - We are connecting as the
gituser - The git repo is stored in the directory
rockstorm101/git-server-docker.giton the remote server.
When the SSH connection is made, the remote server would:
- Authenticate that you have access to the
gituser on their server (yes, you are authenticating to a GitHub server and running remote commands on it) using Public Key Authentication. - SSH will accept the connection on successful authentication and start the default shell configured for the
gituser. - The
gituser has a program calledgit-shellset as the default shell.
/home/git/${folder} to /${absolute_folder} which you can read more about doing.In review, we'd end up configuring our program the following way.
With a general overview of how Git works, we can now work on hosting it on a Kubernetes cluster!
Deploying the Git Server
on kubernetes
There are a handful of ways to run programs on a computer. In recent years people love using containers (me included). Because we'll be using Kubernetes as our platform for deployment, we'll need a container configured with all the tools we mentioned above. There is a small handful of containers to choose from which are already maintained publically.
I decided upon git-server-docker. It provides all the basic configuration I explained above as well as building blocks to extend it using bash scripts on startup.
If you were to use this container, you could write a script that on startup of the container, creates bare repo's for repos that don't exist.
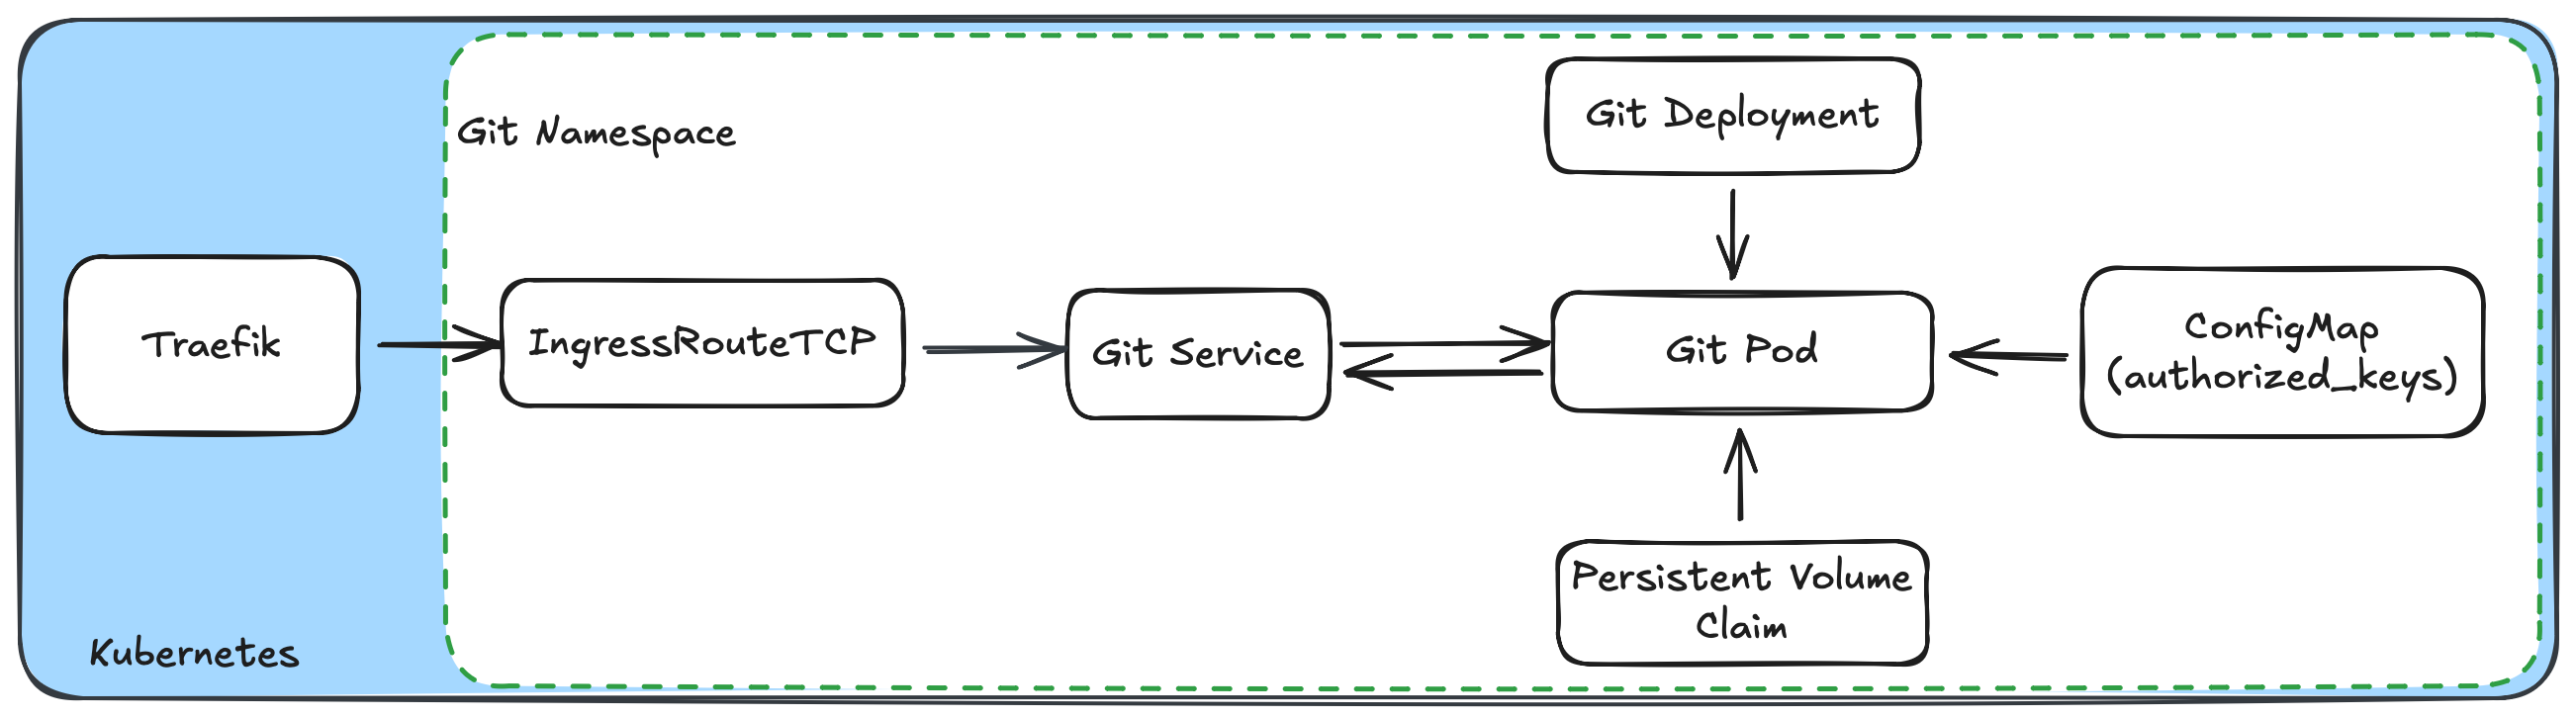
Deploying the Git Server on Kubernetes
Using the container, we can build a simple deployment. The configuration we'll be using is the following:
Persistent Volume Claim
First step of the process would be to create the storage to be used which means creating a Persistent Volume Claim.
yaml has been deleted and shortened for your reading pleasure as every deployment might have different requirements and needs.apiVersion: v1
kind: PersistentVolumeClaim
metadata:
name: git-storage
spec:
resources: { requests: { storage: 50Gi } }
volumeMode: Filesystem
accessModes: [ReadWriteMany]
In this example, I didn't specify the storageClass. Consider using storage on an NFS drive or replicated block storage.
With storage configured for holding our code, we'll create a deployment that will run the git server.
apiVersion: apps/v1
kind: Deployment
metadata:
  name: git-deployment
spec:
  replicas: 1
  selector:
    matchLabels:
      name: git
  template:
    metadata:
      labels:
        name: git
    spec:
      restartPolicy: Always
      volumes:
        - name: data
          persistentVolumeClaim:
            claimName: git-storage
        - name: authorized-keys
          configMap:
            name: authorized-keys
      containers:
        - image: rockstorm/git-server
          name: git
          imagePullPolicy: IfNotPresent
          ports:
            - name: ssh
              containerPort: 22
          volumeMounts:
            - mountPath: /srv/git
              name: data
            - mountPath: /home/git/.ssh/authorized_keys
name: authorized-keysauthorized_keys file we load. This file must include all the public keys we want to allow to authenticate to our server. Creating the config map yaml is an exercise left for the reader.Now that we have deployed our pod, we need to create a service for providing routing to our pod.
kind: Service
apiVersion: v1
metadata:
  name: git-service
spec:
  selector: { name: git }
  ports:
    - name: ssh
      port: 22
      targetPort: ssh
      protocol: TCP
Accepting Ingress to the Server
With the deployment complete, we need to provide ingress into the pod. You could use a NodePort, however, doing so would mean you'd need to update your git urls to include the port that the user would need to connect over. Converting
git@example.com:/srv/git/rockstorm101/git-server-docker.gitinto
git@example.com:30000/srv/git/rockstorm101/git-server-docker.gitTo be honest, that looks kinda nasty.
Instead of using a NodePort, let's use a load balancer like Traefik. Known for its ability to load balance HTTP(S) requests on layer 7 of the OSI stack, it also supports doing load balancing of raw TCP connections (layer 4) which we can take advantage of.
For us to enable this ability in a Kubernetes deployment of Traefik, we need to expose a port on the host system that can accept public internet traffic. I use the Traefik helm chart, so I've updated the values.yaml to include port 22 as exposed.
ports:
  web: ...
  websecure: ...
  git:
    port: 12345
    exposedPort: 22
    nodePort: 31876
    expose:
      default: true
Depending on the way you host Traefik, you will need to edit the CLI or configuration file. Once configured, we can create an ingress route to our git service.
apiVersion: traefik.io/v1alpha1
kind: IngressRouteTCP
metadata:
  name: git-ingress
spec:
  entryPoints:
    - git # port name we openned
  routes:
    - match: "HOSTSNI(`*`)"
      services:
        - name: git-service
          port: 22
And that's how you do it!
So congratulations, you now have a git server deployed. Your first question will probably be, how do I actually maintain this? And the answer for that is manually.
Very very manually.
Out of the box, a git server doesn't have any good ways of supporting more detailed configuration. In my research I found that people would recommend creating an admin user which you'd use to login to the server and maintain the repos. You could also choose to just exec sh into the pod for that as well.
Here are a small handful of things git won't help you accomplish:
- Creating a new repository (manual operation)
- Authorization to push to some repo's
- Discovering different repo's
- Branch protection rules or rulesets
- Viewing contents of your git repo
- Creating issues
- Hosting documentation
- More that I can't think of off the top of my head...
Which might get you wondering...why actually do you want to host your own git server.
For me, it was all about learning about how git servers actually work. It made me realize the value GitHub provides for organizations and user. Having user based authentication, authorization, branch protection rules, ease of use for administration tasks, discoverability of projects, issues, wikis, insights, CI/CD integration, pull requests and now that it's owned by Microsoft, co-pilot and codespaces provides a user with a MASSIVE value. And you can get the majority of these features for free too.
I understand why large organizations would rather run Github rather than their own git servers. It provides a product around git and brings a lot more value to the table than just holding code on a remote server.
Alternatives
I hope that this article got you wondering what work is required to host your own git server. If this all feels a bit daunting, don't worry, there are open source projects that exist that are here to help.
- Gitea is an open source project that provides a GitHub like experience.
- Forgejo is a fork of Gitea. Apparently it was made after Gitea converted to a for profit company.
- Gitolite is shell (like
git-shell) that has extra logic in it to provide branch protection rules and repo creation automatically. Only consider this option if you want a simple git server with authorization capabilities on your git server without a UI.
There are other solutions, however, these are the ones I've spent the most amount of time researching. Let me know if I missed any of your favourite ones! I'd be happy to update the list.
Conclusion
In this article, I presented how to run a Git Server on Kubernetes. I've answered the question, what is a git server and how it works. I've provided a basic configuration of the types of files you'll need to deploy a pod to a Kubernetes cluster to get a deployment working for day 1 operations.